Self-hosting with Docker is a great way to cut web hosting costs if you already have the tools and necessary hardware. During the summer of 2025, I bought a UGreen NAS and I went full on learning Docker. I had some Docker experience after installing it on my Mac Mini M4 and learning how to create compose files. After buying a NAS with Docker built-in, I spent hundreds of hours becoming an experienced Docker user.
What I used to setup my self-hosted WordPress install
- UGreen NAS (you can use something much cheaper like a Raspberry Pi, etc.)
- Docker
- NPMPlus (It’s an NGINX reverse proxy installed via Docker)
- Domain name
Here is my Docker compose file for WordPress with MariaDB database
Things to note:
- WordPress wants to defaul to port 80. Since NPMPlus is using port 80, I used the “ports:” line in my code and mapped the container port 8727 to port 80.
- Don’t forget to change the passwords below! There are 3 total that need updating.
- Under volumes, don’t forget to update the left-side of the colon (:) to indicate where your data is going to be stored for your WordPress and MariaDB files.
services:
  wordpress:
    image: wordpress:latest
    network_mode: host
    container_name: wordpress
    restart: unless-stopped
    ports:
      - “8727:80”
    environment:
      WORDPRESS_DB_HOST: database # Name of your database service
      WORDPRESS_DB_NAME: wordpress
      WORDPRESS_DB_USER: wp_Richard
      WORDPRESS_DB_PASSWORD: UseYourOwnPasswordHere
    volumes:
      - /volume2/docker/wordpress/data:/var/www/html

  database:
    image: mariadb:latest # Or mysql
    network_mode: host
    container_name: wordpress-database
    restart: unless-stopped
    environment:
      MARIADB_ROOT_PASSWORD: UseYourOwnPasswordHere
      MARIADB_DATABASE: wordpress
      MARIADB_USER: wp_Richard
      MARIADB_PASSWORD: UseYourOwnPasswordHere
    volumes:
      - /volume2/docker/wordpress/data:/var/lib/mysql
Using NPMPlus to expose WordPress to the Internet
I exposed WordPress by using:
- NPMPlus (reverse proxy)
- DNS Provider (Cloudflare is free and Cloudns is a cheap alternative to Cloudlfare)
- Domain name
- REQUIRED: Need to login to home router and forward port 80 and 443 to the IP of the device where Docker and WordPress are installed. For additional security, forward WAN port 80 to port 443 since HTTP is insecure.
Login to your DNS provider and point your domain to your home IP address. I have AT&T fiber Internet, and my home IP address never changes. If that’s not the case for you, then you will need to signup for a Dynamic DNS provider.
In my NPMPlus software that I’m running via Docker, I enter in the domain name and forward to http://192.168.1.3 – Port 8727. What you enter will most likely be different. 192.168.1.3 is the IP address of my UGreen NAS, which is where Docker and WordPress are installed.
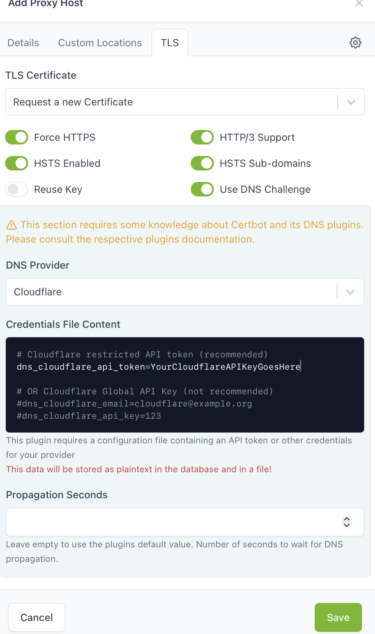
You also need to have an SSL certificate installed. On the TLS tab of your Proxy Host within NPMPlus, you’re going to have to select your DNS Provider. In my case, it’s Cloudflare. You then need to provide your Cloudflare API key in the box below:
Conclusion
If everything is successful, your SSL certificate should generate via NPMPlus and you should be able to access WordPress via your public domain. Keep in mind, you need to wait for DNS to propogate in order to visit your website and for your SSL certificates to install properly. If you get any errors, give it a little time and try again.
Something else to note; a lot of companies block websites that are self-hosted. I tried self-hosting WordPress, but soon realized that a number of people couldn’t visit my website on their company’s network. Companies tend to be overzealous with their firewall rules, so I’m not entirely surprised. With that being said, I ended up moving my website over to a cheap cPanel web hosting provider since this is a resume website afterall.